

Booking airfare usually feels less like planning a trip and more like betting against a system that knows all the rules and does not tell you any of them. One day a flight is two hundred dollars. The next day it has doubled for no obvious reason.
I used to find that chaos maddening. Then I realized you do not have to guess. Once you understand what Google Flights is showing you, most of the mystery disappears.
Google Flights is fast, relatively clean, and not trying to sell you five add-ons before you see the actual ticket price. It pulls live prices from airlines and online travel agencies so you can actually compare things that matter.
Here is exactly how I use it, step by step, to get better fares and avoid garbage itineraries.
1. Use Google’s Calendar, Date Grid, and Price Graph to Zero In on the Best Dates
Choosing the right travel dates is the single biggest lever for saving money. Google Flights gives you three tools that work together. Start broad with the Calendar View, refine with the Date Grid, then zoom out with the Price Graph.
Together, they turn date selection from guesswork into strategy.
1.1 Start with the Calendar View for the Big Picture
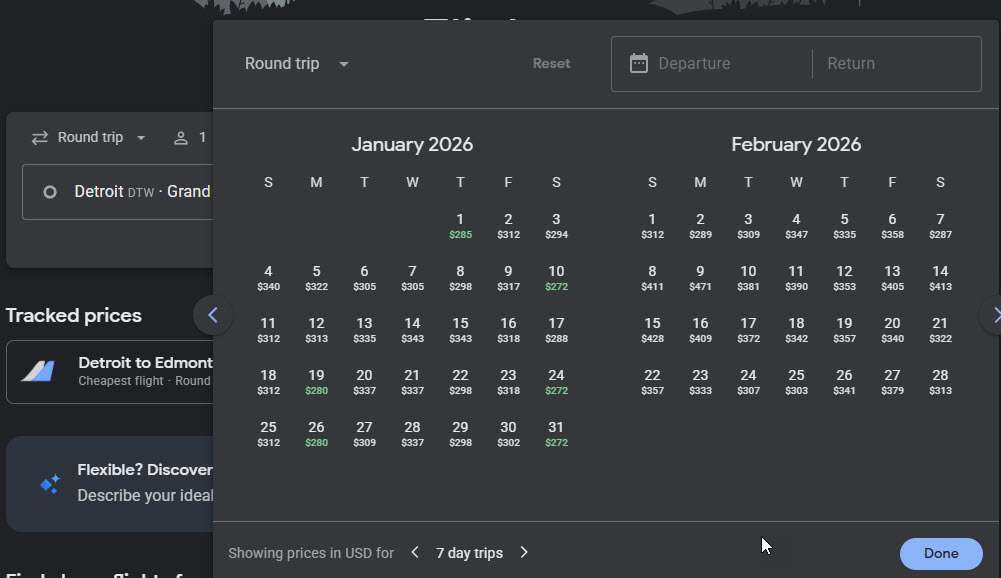
After entering your route, click the departure date to open the calendar. This view shows prices for each day of the month, and Google highlights the cheapest dates in green.
Scan the calendar for:
- Clusters of green dates
- Noticeable weekly dips
- Patterns around weekends, holidays, or peak travel seasons
At the bottom of the calendar is the trip length selector. Set how long you want your trip to be—3, 5, 7, or a custom number of days—and the calendar updates every departure date with the price for that exact stay length.
This saves time and helps you quickly see which start dates offer the lowest total price.
1.2 Switch to the Date Grid to Compare Exact Date Pairs
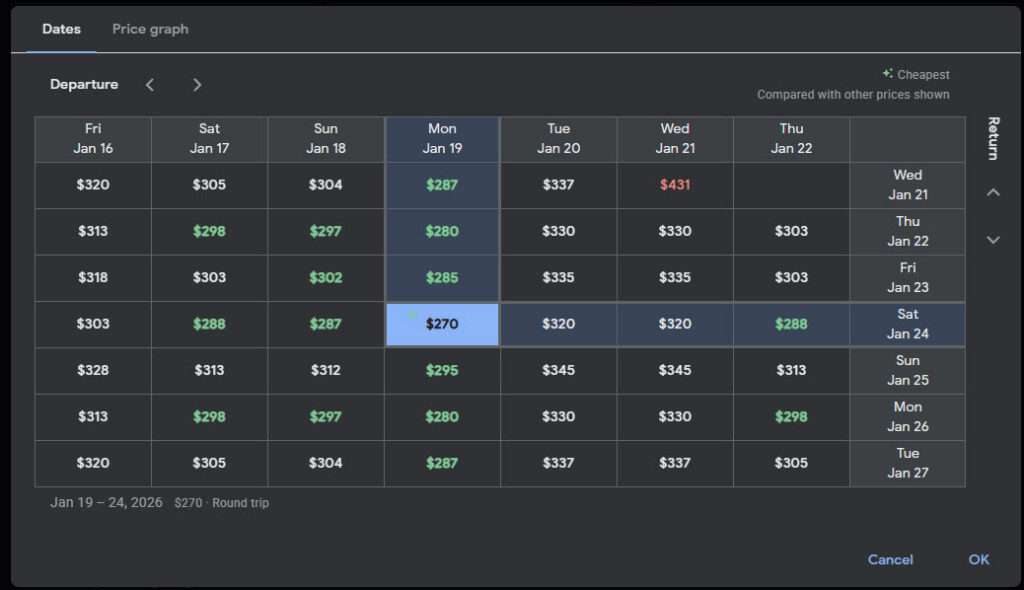
Once you know which general timeframe looks good, click Date Grid next to the calendar.
This view shows:
- Departure dates along the top row
- Return dates down the left column
- The price for each pair in the grid
It is perfect for confirming which combination is actually cheapest. It makes patterns jump out instantly:
- Leaving Thursday may be cheaper than leaving Friday
- Returning Tuesday might save money compared to returning Sunday
- Weekend travel often spikes pricing
- One leg of the trip might be driving most of the cost
Date Grid is where you refine the dates you found in the calendar.
1.3 Use the Price Graph to Spot Trends Over Time
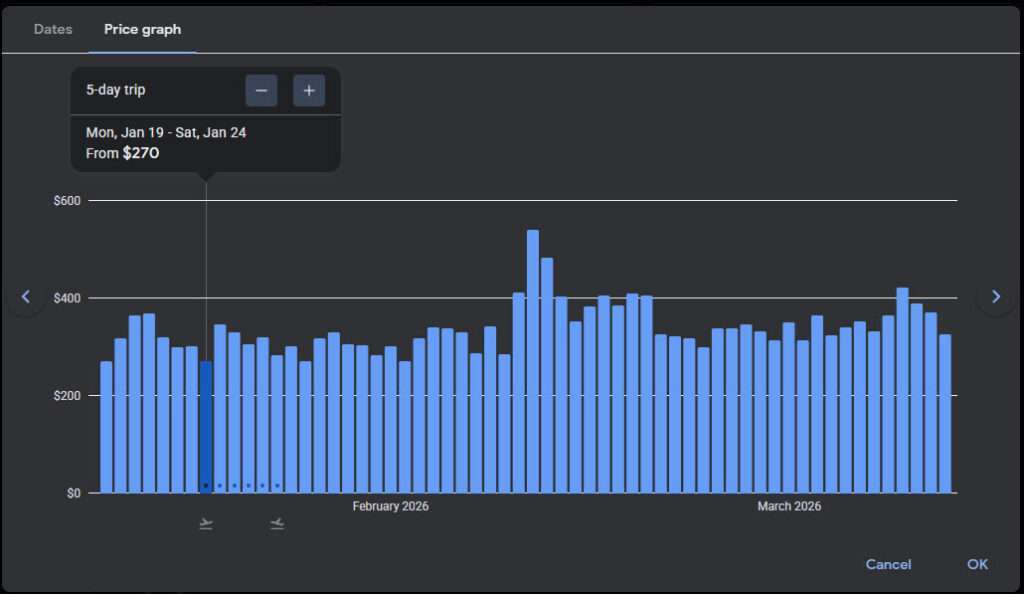
After narrowing down your options, open Price Graph to see the pricing trend across several weeks or months. This is the “zoom out” tool that helps you understand timing instead of individual dates.
Price Graph shows:
- A line chart of fares across time
- Your selected trip length highlighted
- Natural peaks and valleys in pricing
- How shifting your trip forward or backward affects cost
You can also adjust the trip length plus/minus buttons to see how staying longer or shorter changes the total fare.
This view is especially helpful for:
- International trips
- School breaks
- Peak season travel
- Large events or holidays
- Months where seasonality matters
Price Graph gives you the context to decide whether you are booking during a naturally cheap period or a price spike.
How These Tools Work Together
The process looks like this:
- Calendar identifies the cheap windows and helps you choose a stay length.
- Date Grid shows you which specific combinations inside that window are the best deal.
- Price Graph confirms whether those dates are actually favorable compared to the surrounding weeks.
Used together, these tools turn the date-picking process from a guessing game into a straightforward strategy.
2. Put Multiple Airports into One Search
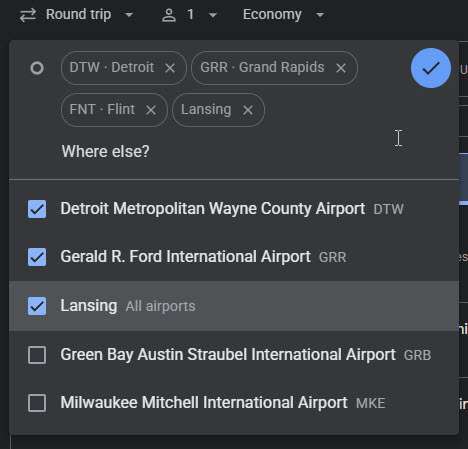
This is one of Google Flights’ most helpful but least-used tricks.
Step 1: Add multiple departure airports manually
In the “From” box, type:
DTW, LAN, GRR, FNT
Google will search all of these at the same time and show the cheapest options. This is the closest thing to a “region search” Google Flights offers.
Step 2: Build and reuse your own airport list
Google used to automatically detect nearby airports if you typed “near Detroit” or similar wording. For unknown reasons, that feature is gone.
Instead:
- Decide which airports you are willing to consider.
- Create your own list.
- Use it every time you search.
This takes 30 seconds once and saves money forever.
In a perfect world, Google would let you save your group of favorite airports and make it the default when you start a search. That’s not currently a feature but a guy can hope.
Michigan Tip:
If you’re in mid-Michigan, don’t overlook LAN, GRR, and FNT. Parking is cheaper, the airports are easier to navigate, the drive might be easier or shorter, and every once in a while one of them beats DTW by enough to justify maybe a slightly higher ticket cost.
3. Use Explore When You Only Know You Want To Go
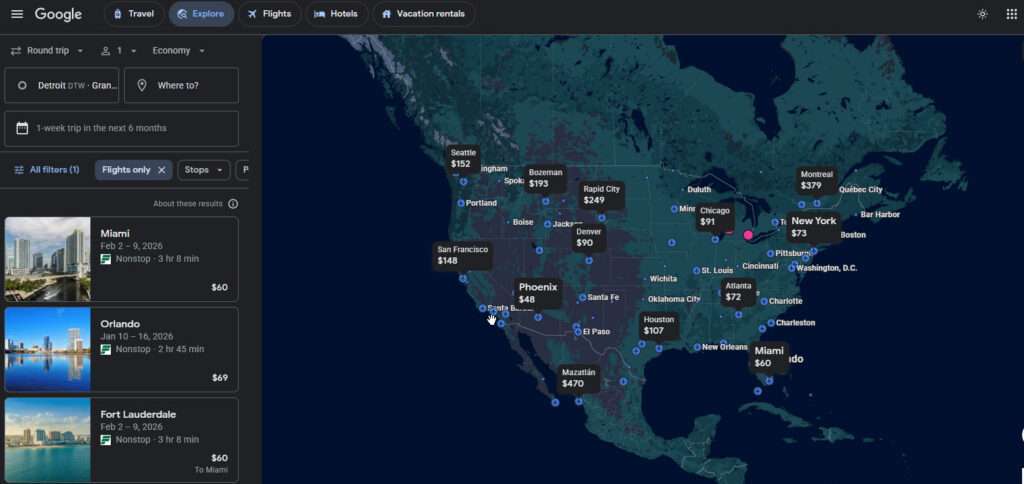
Sometimes you do not care exactly where you go. You just want to escape winter or find a cheap long weekend somewhere.
Step 1: Open Explore
- Start on Google Flights.
- You can enter your starting airports but leave the destination set to anywhere and the dates blank.
- Click “Explore.”
You will see a map with prices pinned to cities.
Step 2: Filter by trip length first
- In Explore, set trip length: “Weekend,” “1 week,” or “2 weeks.”
- Then choose a month or “Next 6 months.”
Google will highlight the cheapest week-long (or weekend) trips for that period, which is much more useful than picking dates first and hoping.
Step 3: Combine nonstop and price caps
- In the filters, set “Stops” to “Nonstop only.”
- Set a maximum price, for example $300 or $400.
Now the map shows every nonstop route under your budget. This is a fantastic way to see all viable short-haul and regional options at a glance.
Step 4: Use Explore with multiple departure airports
You can also pair this with the multi-airport trick so Google is checking several departure cities while Explore displays the map.
4. Run the Filter Gauntlet

Google Flights shows every possible itinerary by default, including a lot of junk you’d never actually book. Filters let you strip out the noise and quickly surface the routes that are actually worth considering.
There are two groups of filters I use: the essential ones I set every time, and the advanced ones that refine the search once I have a baseline.
Core filters I set every time
1. Bags: Force the real price
- Set “Bags” to at least “1 carry-on.”
This eliminates Basic Economy bait fares that don’t allow overhead bin space. It forces Google to show you the true price of the ticket you’ll actually fly.
2. Stops: Sanity check for nonstop
- Start with “Nonstop only” to see the baseline.
- Then compare that to “1 stop or fewer.”
I always favor the nonstop option however, if adding a layover saves a couple hundred, then I look closer at the details. Either way, be conscious of the length of the layover, the possibility of weather based delays, and whether or not you’re checking a bag.
3. Times: Protect your sleep
- Move the departure time slider so you are not taking a 5 or 6 AM flight unless you truly want that.
I usually block out departures before 7 or 8 AM. Saving a few dollars is not worth getting up at 3:30 AM to drive to DTW.
Advanced filters most people never touch
4. Connecting airports: Avoid the hubs you hate
- Click “All filters.”
- Look for “Connecting airports.”
- Uncheck airports you want to avoid, especially for winter travel.
Examples:
- Uncheck ORD or DEN in winter to lower your chance of snow delays.
- Prefer ATL if you know it well and like the options there.
This gives you some control over where you will be stuck if things go wrong.
5. Airline Exclusions: Remove Carriers You Refuse to Fly
Most people know you can filter for specific airlines, but Google Flights also lets you quietly filter against airlines you do not want to use. This is especially useful if you’ve had consistently bad experiences with a carrier, dislike their seating or boarding policies, or just don’t like the idea of riding in something that looks more like a banana than an airplane.
Under Airlines, you can:
- Select only the carriers you trust
- Or manually deselect the ones you want to avoid
Why it matters:
- Some budget carriers advertise cheap fares but charge aggressively for bags, seat assignments, or carry-ons
- Certain airlines have poor on-time performance on specific routes
- A few carriers operate older aircraft or have cramped seating layouts
- Customer service varies widely across airlines, which matters when things go wrong
If a carrier has burned you before, there is no reason to let their flights clutter your results. Narrowing your airline list keeps the results focused on options that align with your comfort level, expectations, and tolerance for risk.
This filter is especially helpful for:
- Avoiding ultra-low-cost carriers with heavy fees
- Sticking to airlines with consistent baggage rules
- Ensuring elite-status benefits apply
- Improving reliability by steering clear of weaker-performing operators
A small tweak, but it removes a lot of noise and keeps your search aligned with your personal preferences.
6. Alliances: Stay loyal without overpaying
If you care about miles or status:
- Open “Airlines” or “Alliances.”
- Select SkyTeam, Star Alliance, or Oneworld.
This keeps you earning with your preferred ecosystem while still letting partner airlines compete on price.
7. Duration: Cap total travel time
Use the travel duration slider to avoid “cheap but miserable” routes.
- If a direct flight is 4 hours, you might cap your search at 7 hours total.
- Anything beyond that is probably not worth it for a modest discount.
8. Aircraft type: Check the Plane Before You Book
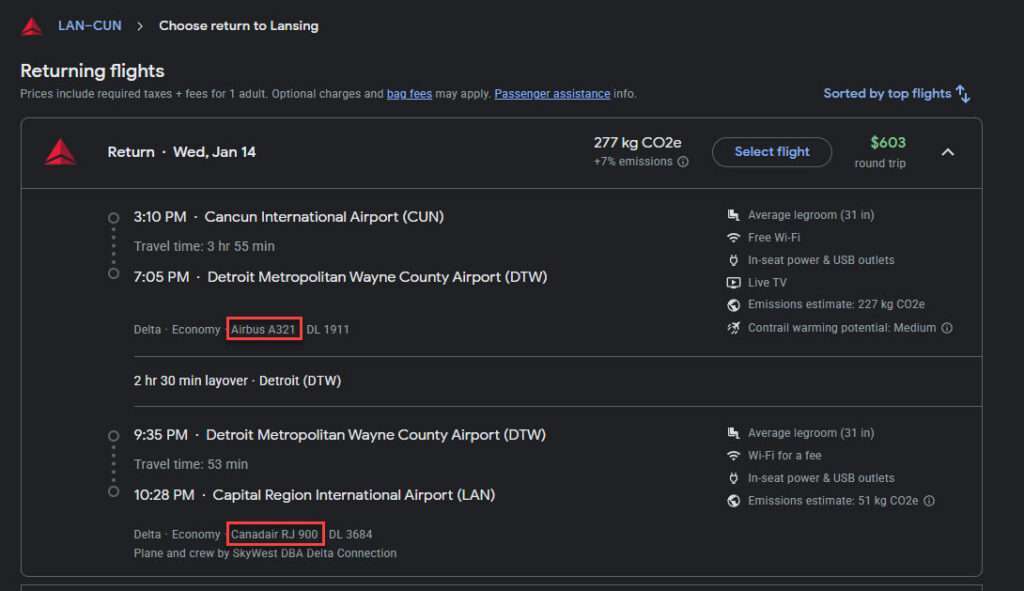
Google Flights doesn’t let you filter by aircraft type, but it does show you the aircraft model once you click on a specific flight. This is worth checking because not all planes are equal in comfort or experience.
How to see it
- Click any flight in the results list.
- In the expanded details, look for the aircraft model (737, A321neo, 787, A350, etc).
Why it matters
Comfort varies a lot between aircraft models
Newer aircraft like the A321neo, A220, 787, and A350 are usually:
- Quieter
- More fuel efficient
- More comfortable
- Better pressurized
- Equipped with newer interiors
Older or regional aircraft can be tighter, noisier, or less comfortable for long flights.
You might find better planes at the same price
Sometimes two flights cost exactly the same, but one is on an older 737-800 while the other is on a 787 or A321neo.
Checking the aircraft lets you choose the better experience for no extra money.
Widebody domestic flights are hidden gems
Certain routes randomly use long-haul planes (767, 777, A330, 787).
These typically cost the same as narrowbody flights on the same route but may offer:
- More spacious cabins
- Better entertainment
- More comfortable seats
- Smoother ride quality
Difference in seat layouts
Some aircraft have:
- Better legroom
- Wider seats
- USB/AC power
- Larger overhead bins
A quick check prevents surprises.
When to check the aircraft type
Use this as a tiebreaker when:
- Two or three flights have similar prices.
- You’re booking a long domestic route.
- You want to avoid older or less comfortable aircraft.
It takes a few seconds but can hugely improve your overall travel day.
If you want to compare aircraft types before booking, there are a few helpful tools.
- AeroLOPA has the most accurate, modern cabin diagrams for major airlines.
- SeatMaps and Skytrax help you understand comfort differences between aircraft models.
If you’re debating between two similar-priced flights, checking the aircraft on one of these sites can quickly tell you which one offers the better experience.
8. Allow long layovers on purpose for mini stopovers
Most people try to avoid long layovers, but sometimes they are actually a hidden opportunity. When you extend the layover filter to allow connections up to 24 hours, Google will surface itineraries that spend half a day, or even a full day, in another city along the way. These usually cost the same as a standard connection.
Why consider this?
- You get a bonus destination for free.
Flying to Europe via Reykjavik or Amsterdam with a long layover gives you enough time to leave the airport, explore the city, grab a meal, and check out a landmark before continuing on. It is basically two trips for the price of one. - It breaks up long-haul fatigue.
A 14-hour slog can be rough. Splitting it into two smaller flights with a meaningful break can make the entire journey easier on your body. - You can leverage world-class hubs.
Some airports are destinations in themselves. Places like Istanbul, Singapore, and Dubai are known for great food, lounges, showers, and shopping. A long layover there feels more like a recharge than a chore. - It helps with time zone adjustment.
Spending part of a day in a connecting city can soften the blow of big time changes and make the arrival in your final destination more manageable. - It is a way to sample a city before committing to a full trip.
If you are curious about a place but not ready to invest in a full vacation, a long layover gives you a low-risk taste.
This tactic turns something travelers normally dread into a strategic advantage, and it costs nothing extra when Google exposes those routes.
Adjust layover filters to allow 5–24 hour layovers when flying internationally to find extended layovers:
9. Clear the filters after you get a baseline
Once you have a good sense of reasonable options:
- Click “Clear All” under the All filters dialog.
- Scan the results again.
Sometimes this reveals unusual itineraries you had filtered out. Those can occasionally offer big savings, especially for flexible travel.
5. Pricing Strategies That Actually Work
Now that you have good routes visible, it is time to play with price structure.
Strategy 1: Check one-way tickets first
- Search one-way for your outbound.
- Search one-way for your return.
Sometimes:
- Airline A is much cheaper outbound.
- Airline B is cheaper inbound.
If the combined cost beats the round-trip fares, it may be worth booking one-ways.
Strategy 2: Move only one leg at a time
Instead of shifting both dates together:
- Lock in your outbound. Move only the return by a day or two.
- Lock in your return. Move only the outbound by a day or two.
This reveals quirky pricing on specific travel days that you will never see if you only move the whole trip block at once.
Strategy 3: Understand mixed-carrier tickets vs separate tickets
You will often see results like:
- Outbound on Delta
- Return on United
If Google shows these as one itinerary and sends you to a single airline or OTA to book them, that is a normal “mixed carrier” round trip. Your connections are protected. If something goes wrong, the ticketing carrier is responsible.
Separate tickets are different:
- Google will explicitly label these as “Separate tickets booked together.”
If you miss your connection on separate tickets, the second airline does not have to help you. I usually only consider this if:
- The savings are very large, and
- You are traveling with only a backpack, and
- You can handle schedule risk.
Strategy 4: Hidden-city ticketing and skiplagging (do not do it)
Hidden-city ticketing, also called skiplagging, is when someone books a flight with a connection in their real destination, then gets off at the layover airport instead of taking the final leg, because that ticket is cheaper than flying to the layover city directly.
Google Flights can sometimes reveal these pricing oddities when you compare routes with different final destinations, and it is useful to understand that this is one reason airline pricing seems irrational.
However, I strongly advise against actually doing it:
- It usually violates airline contracts of carriage.
- Airlines can cancel your remaining segments.
- They can claw back frequent flyer miles.
- In extreme cases, they can shut down your loyalty account.
It is interesting as a pricing concept, but not a good strategy to use in practice.
6. Let Google Track Prices For You

You do not need to babysit the fares yourself.
Step 1: Turn on price tracking
Once you have a route or specific dates you care about:
- Flip on “Track prices” for the route or the exact itinerary.
- Google will email you when prices move.
Step 2: Track routes, not just dates
Tracking only specific dates is fine, but tracking the entire route is better if you have flexibility. Google then alerts you to drops across the month, not just your initial dates.
Step 3: Use the “low, typical, high” indicator
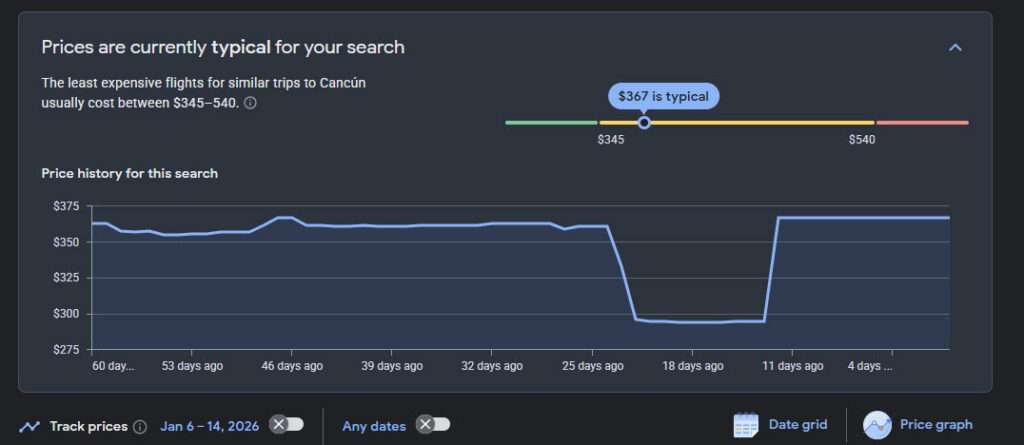
Google often shows a small graph or message like:
- “Price is low for this trip”
- “Price is typical”
- “Price is high”
This is based on historical prices for that route and date range. I use it like this:
- If it says “high,” I usually wait if I am not close to departure.
- If it says “low,” I book with confidence.
Step 4: Ignore the incognito myth
Using incognito mode in your browser does not change prices on Google Flights. Google is querying airline and OTA systems, not adjusting prices based on your personal cookies. You can stop worrying about that one.
7. Timing Rules That Actually Matter
A few timing patterns are worth keeping in mind.
Rule 1: Watch the 21 / 14 / 7 day windows
Many airlines adjust fare buckets:
- around 21 days before departure
- again around 14 days
- again around 7 days
If you are booking close to your trip, check prices right before these thresholds. Waiting too long after them can cost you.
Rule 2: Use shoulder seasons
Explore mode plus “Any time” often surfaces cheap shoulder-season fares:
- Europe in spring or late fall
- Mexico and Caribbean outside holidays
- National parks outside school breaks
You can see these simply by scanning the map over different time ranges.
Rule 3: Avoid heavy business travel days when you can
Some routes are more expensive on Mondays and Fridays due to business travelers:
- DTW to major business hubs like JFK, LGA, ORD, DCA and similar
If your schedule is flexible, flying Tuesday, Wednesday, or Saturday on these routes often drops the price.
8. When You Don’t Want to Do Any of This: Use a Trusted Travel Advisor
Everything above is great if you enjoy digging into the details and comparing fares yourself. But not everyone wants to analyze calendars, compare alliances, or tweak filters. And even if you do enjoy it, sometimes you simply do not have the time. Honestly, sometimes the search can be exhausting.
In those cases, the smartest move is letting a trusted travel advisor handle it for you.
A good advisor:
- Knows the airline pricing patterns
- Has access to industry tools that go beyond Google Flights
- Understands fare classes and restrictions
- Might be able to match or beat publicly listed prices
- Can put together flights, hotels, transfers, and insurance in one clean package
- Saves you from spending hours researching
- Becomes your support line when something goes sideways
Instead of sorting through dozens of itineraries, you can just say:
- “I need to get to Mexico in March for 7 nights,” or
- “Find me the best balance of price, comfort, and schedule.”
Then they do all the hunting for you.
If you already have a travel advisor you trust, use them. If you do not, find one with good referrals and experience booking the type of travel you enjoy or just get in touch with Ali, a friend of the blog. A strong advisor is like having a personal airfare strategist, except you do not have to do any of the work yourself.
The Bottom Line
Do I use every one of these tips every time I book a flight? No. I pull out the ones that fit the situation. Think of this as a toolbox. Use the tools that solve the problem in front of you.
Google Flights won’t magically produce a fifty-dollar ticket to Tokyo, but it will help you stop guessing. Once you learn how to read the calendar, compare airports, tune the filters, and track prices, airfare becomes something you can understand instead of something that feels random.
The real payoff isn’t just the money saved. It’s the confidence that when you click “Book,” you’re making a smart, informed choice.
And if saving a hundred or two hundred dollars means better meals, better gear, or an extra trip each year, that is a win every time.
This is a fantastic collection of useful tips/tricks to get a good deal on flights. I have thoroughly enjoyed messing around and pulling the “levers” to see what kind of deals I can find. Thanks Steve!